Communication, podcasting, Social Media, Tools

Our Cub Nation Station podcast is up and running and it couldn’t have been easier!

(After I composed this post, I realized it became fairly lengthy. EEK! I tried to include lots of HOPEFULLY helpful planning details, but be looking for some follow-up posts with specific info about Anchor, SoundCloud, and Headliner!)

Each week my district hosts two radio shows featuring staff and students talking about the great things happening in Brenham ISD. Last year, I started hosting one of these shows, which provided a perfect opportunity for me to expand our content to a podcast this year. The station manager graciously allows me to bring in my own recorder to grab those weekly interviews for our new Cub Nation station podcast. It has been SO EASY to take the content we are already producing and put it into a podcast format to reach a greater audience. Below are the steps I take and the tools I use to produce the weekly episodes. If you’re thinking about starting a podcast, I say DO IT! There’s nothing to fear!

Step 1: Schedule the interview

  • I send a Google Sheet to all of our campus and district administrators at the beginning of each year so they can easily sign up for an interview date/time slot.
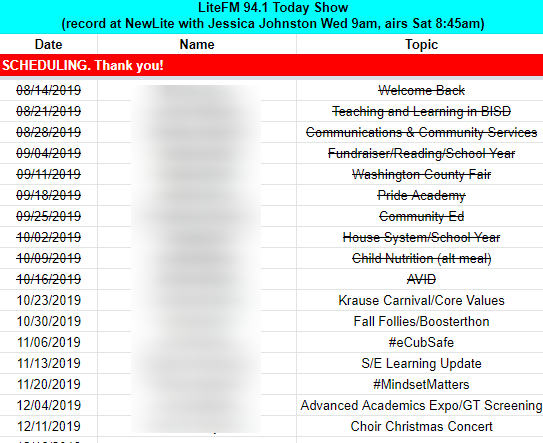
  • I encourage them to choose a date that is MEANINGFUL (ex: coincides with a special event, celebration or time of year).
  • They write 5 questions (with short answers … I’ll tell you why later!) and share them with me in a Google Doc.
  • Once all admins have had a chance to sign up, I reach out to student group sponsors and special programs staff to get a variety of voices on the show.

Step 2: Record the interview

  • This year I bought a Zoom H1n Handy Recorder for recording the podcast episodes. It’s super easy to use and has great sound quality.
  • I just set it up on the table in between my guest and me and press the little red record button to start and stop.
  • It came with a micro-SD card and an adapter so I can easily transfer the audio file to my computer.

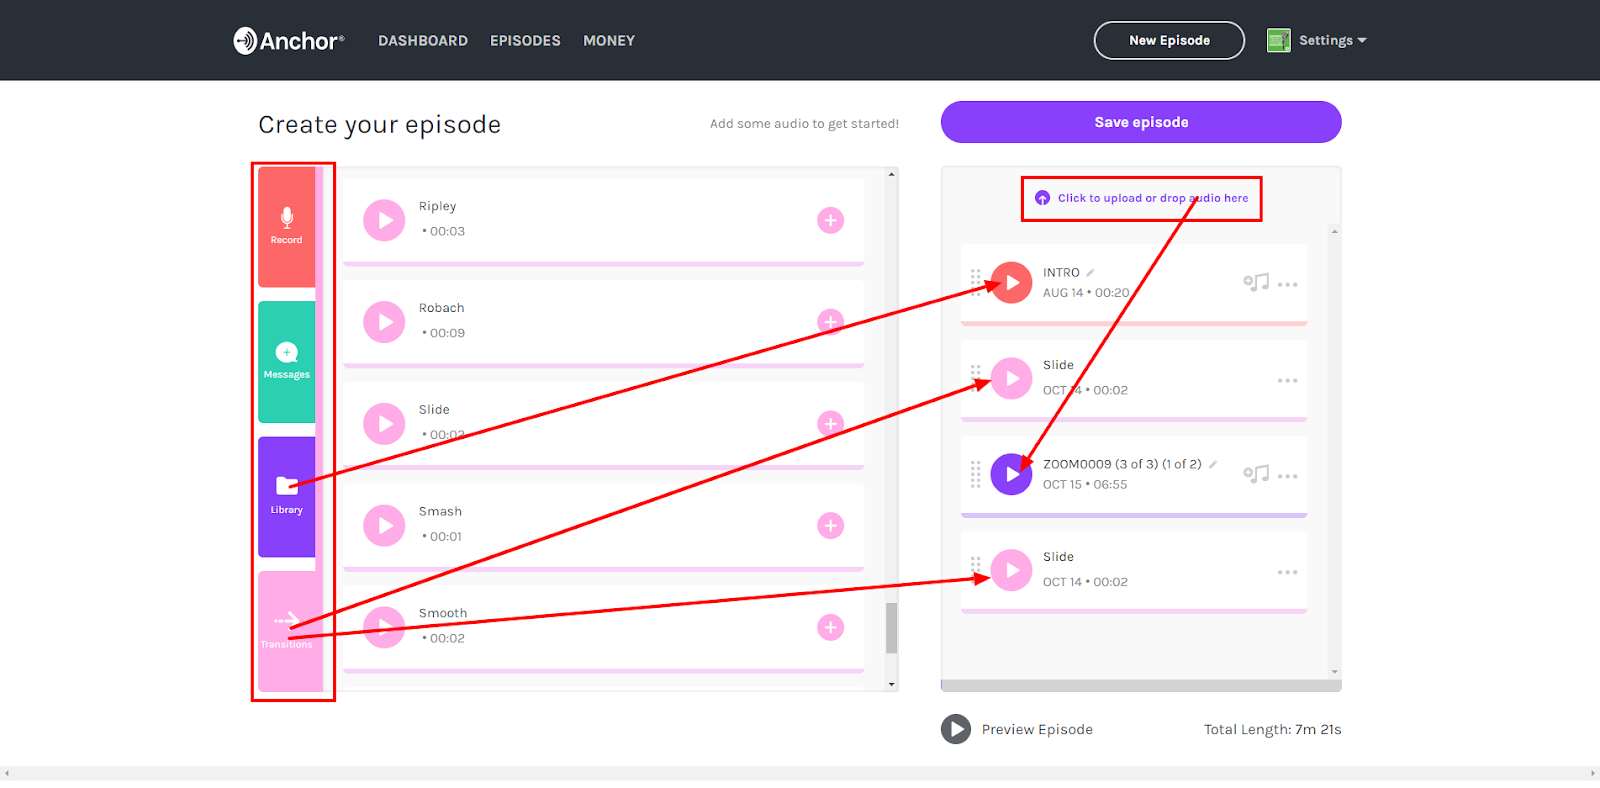
Step 3: Publish the podcast episode

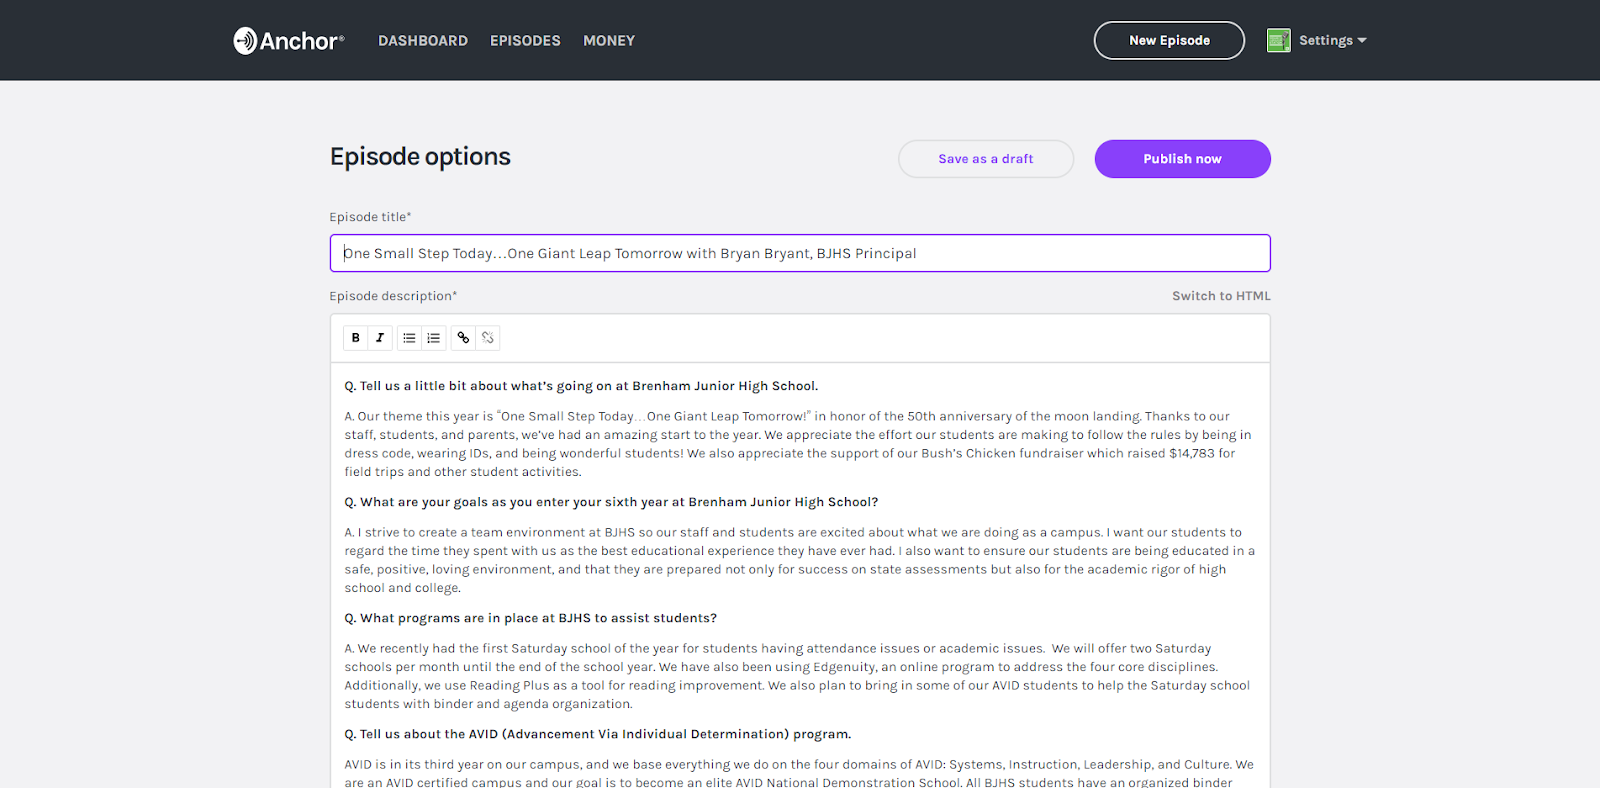
  • I am using Anchor to publish our district podcast and I highly recommend this for starters! It’s FREE and it’s EASY! Plus, it automatically pushes my podcast to 6 different platforms each time I publish a new episode.
  • The high-level steps in Anchor look like this … 
    • Import my podcast intro from my library (previously recorded)
    • Insert the “slide” transition clip from the Anchor library (personal preference)
    • Upload the episode from my Zoom micro-SD card
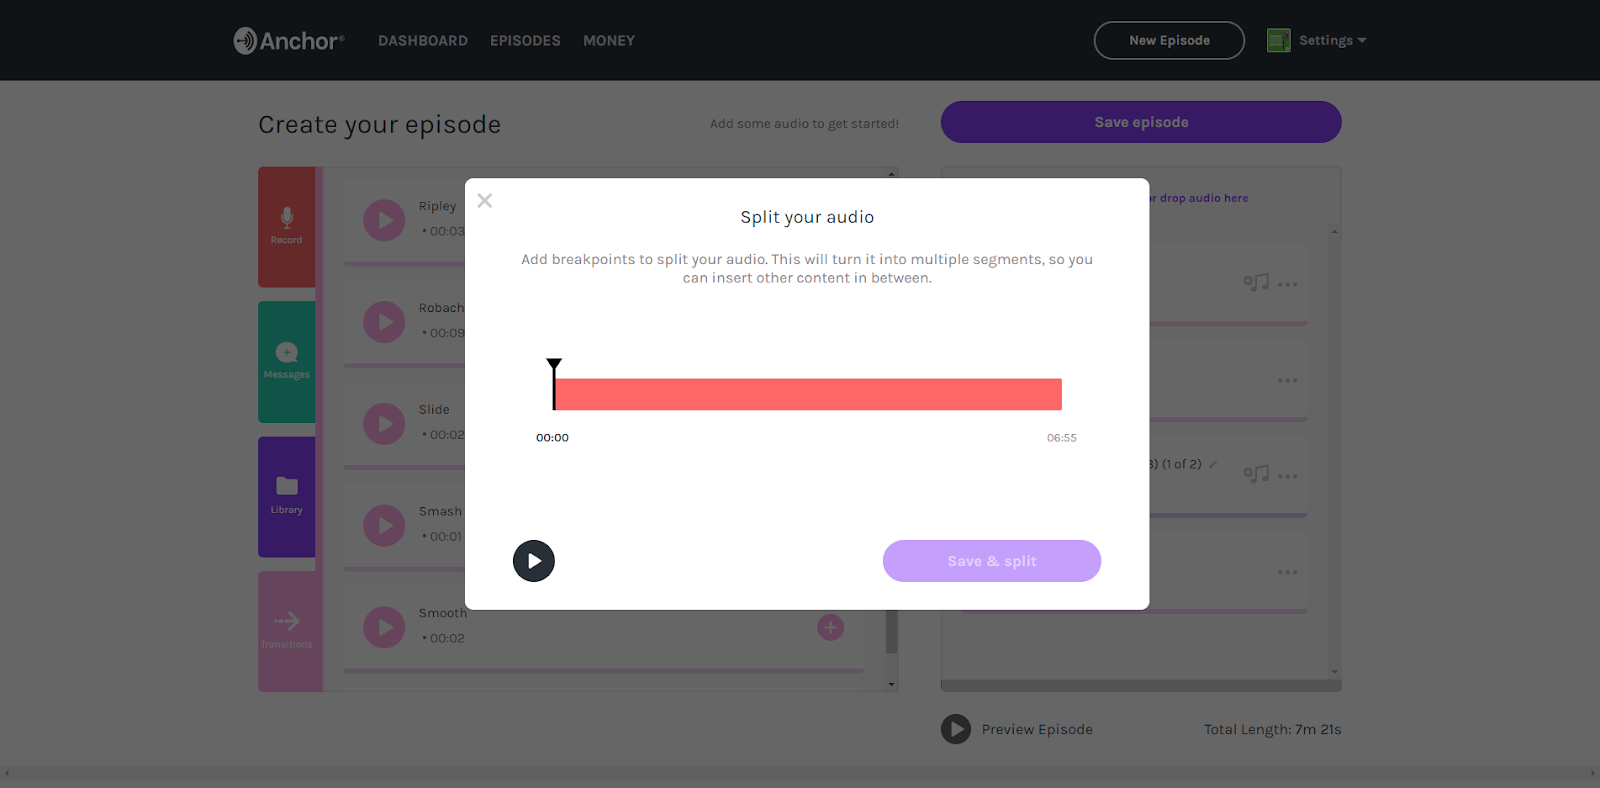
    • Split the audio to trim the ends of the episode (gets rid of our chatting before and after)
    • Insert the “slide” transition clip from the Anchor library again at the end
    • Save episode
    • I then use the questions and answers from the Google Doc the guest shared with me for the episode notes and also for a “5 questions with” newsletter on our district website. (work smarter, not harder!)

Step 4: Advertise the new episode

  • My podcasting pals Justin Dearing and Erin McCann shared this AMAZING tool with me called Headliner. It does A LOT of stuff, but I use it to record teasers for my latest episodes. (This tool will likely require a more detailed future blog post!)
  • The high-level steps for Headliner look like this …
    • I use Canva to create a square image with the title and topic of my episode and a picture of the guest. 
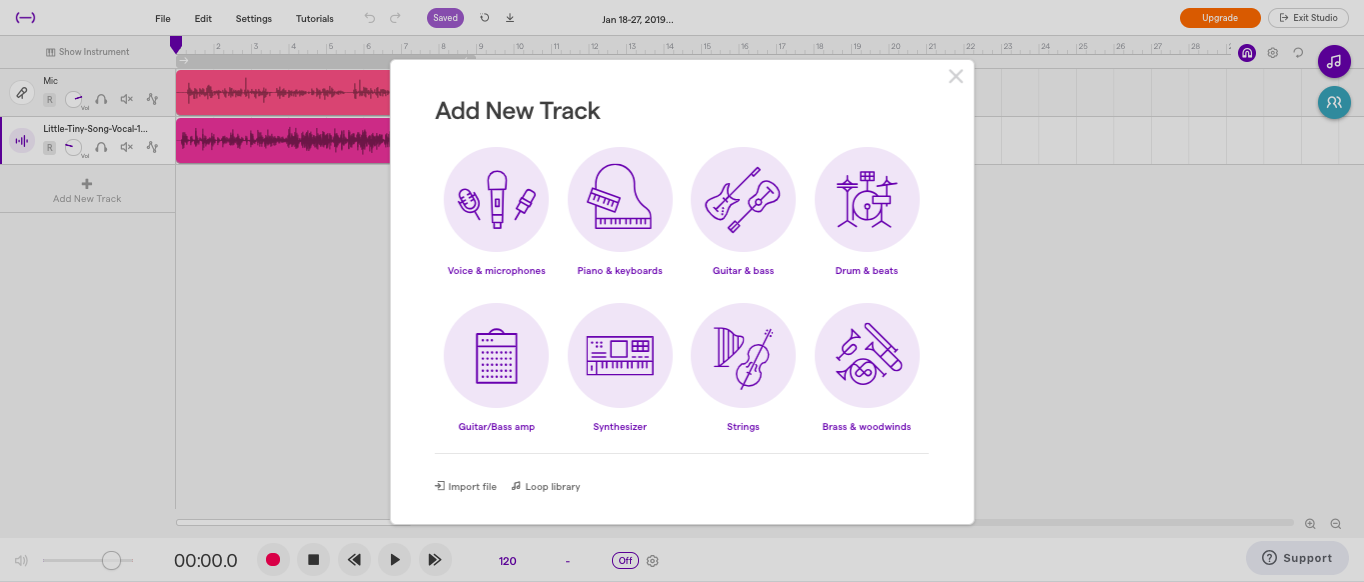
    • Then, I drop the file from my Zoom recorder into Soundtrap to trim it into a 15-30 second teaser.
    • Headliner then helps me turn the audio teaser into a cool animated waveform on top of the Canva image that I can share on social media with a link back to the full episode.
  • You can see an example of the headliner teaser here.

I fully accept that there is probably an easier (and more sophisticated) way to do all of this, but it’s working for me now and it’s all FREE! 🙂

“Not-so-pro” tips: 

  • There are NO ambushes on my shows. The guests know exactly what I am going to ask because they wrote the questions! This is why they keep coming back – I don’t scare them away with questions they’re not ready to answer!
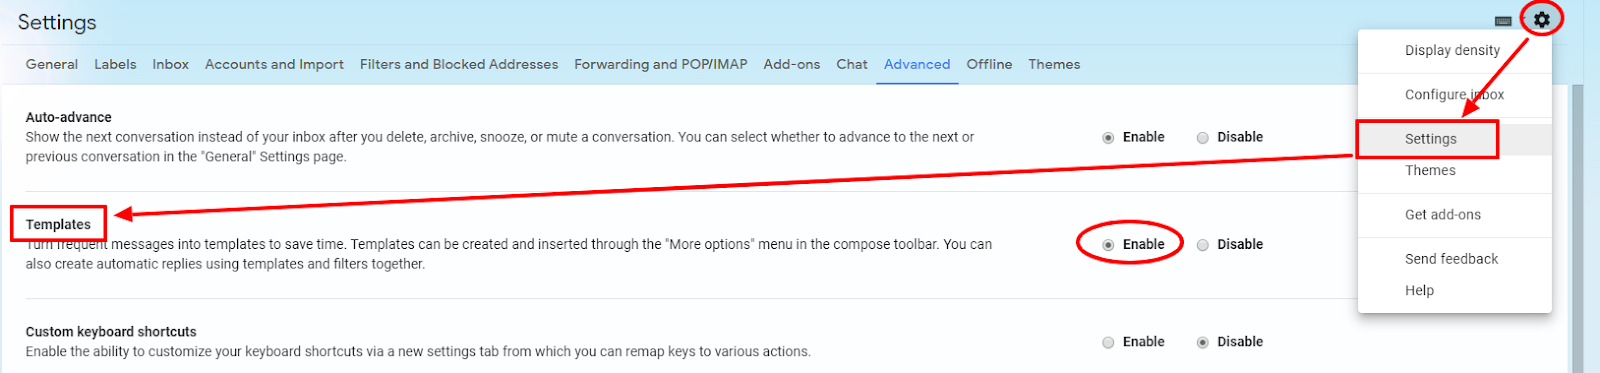
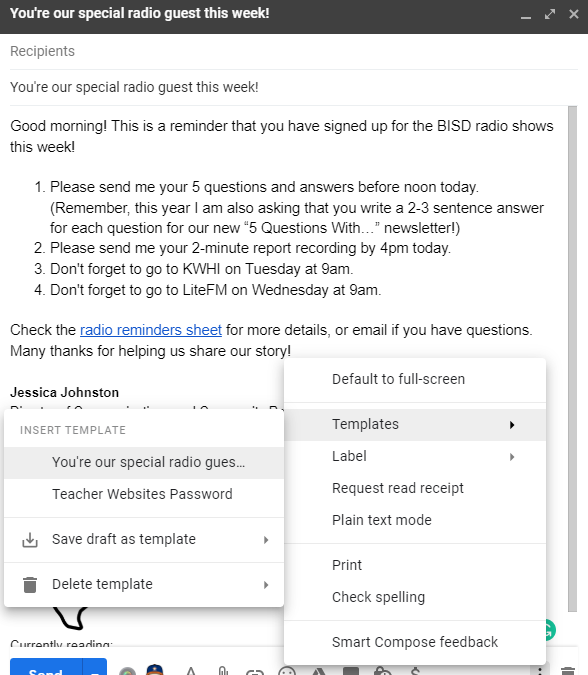
  • I use a canned response in Gmail to send guests a reminder the week of their shows. You can turn on canned responses or “templates” in your Gmail settings.
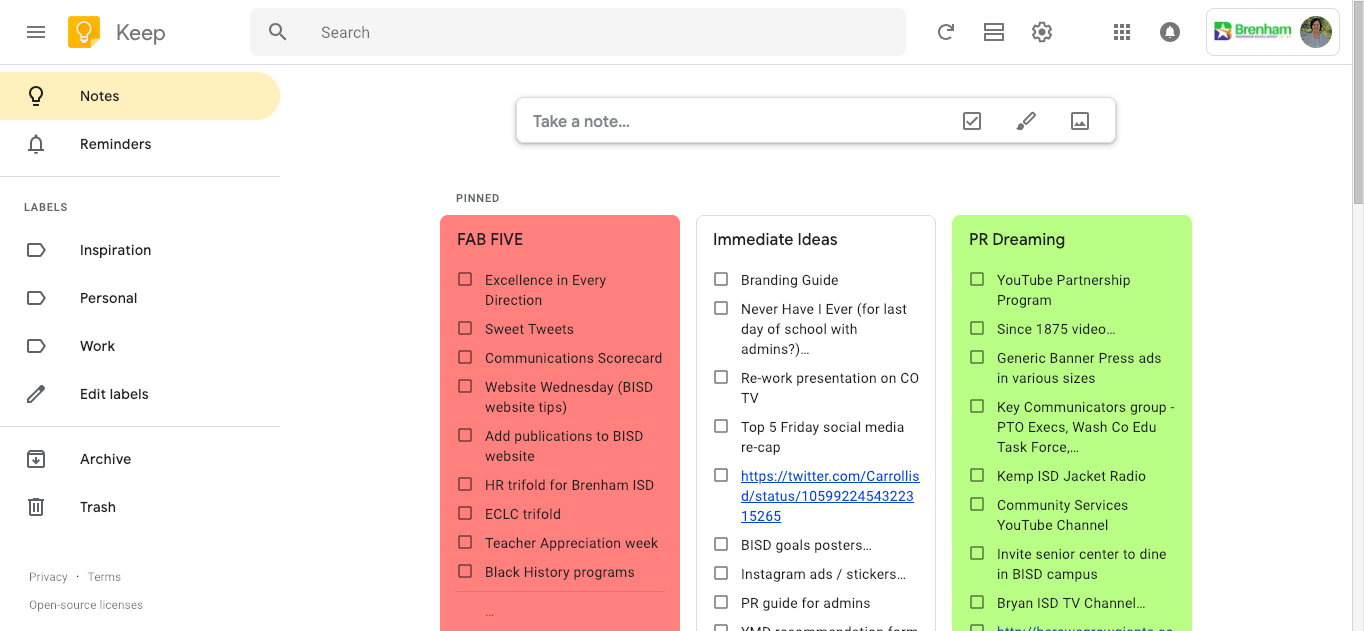
  • I use the RSS feed from Anchor to push episodes to a page on our district website so all of my social media posts lead back to our district site. 🙂

Do you have a podcast? What are your favorite tools, tips, and tricks? I’d love to learn from you!

Branding, Communication, Google, Marketing, Productivity, Tools, TSPRA

Are you new to school PR or building a new school PR program? These 5 documents can help you get started!

I was recently contacted by a newly hired school PR professional who is building a brand new PR program in her district. Having done that very thing 3 years ago, I was happy to offer my input and share my resources. With the help of MANY veteran school PR pros (thank you CASPRA, TSPRA, and NSPRA!), I’ve filled my toolbox and developed some documents that anyone can use to get a school PR program off the ground. I’m so happy to share those documents with you!

Please feel free to make copies of any of these documents and use them to develop your school PR program or share them with someone who can benefit! They’re all in Google Doc format, so you just have to go to File > Make a Copy to create your own version. Sharing is caring! We’re better together! 🙂

  1. Communications and Community Relations Plan – having a road map to guide communications efforts is incredibly helpful in beginning a new program, keeping it on track, and evaluating it annually for effectiveness.
  2. Annual School PR Tasks Checklist – I find that having a sort of “dashboard” for my annual and monthly tasks is helpful for big picture planning, prioritizing and making sure nothing slips through the cracks.
  3. Branding and Style Guide – I looked at dozens of style guides, some simple and some very in depth, before developing this one for our district. I settled on a simple and straightforward version, leaving room for the addition of details in the future, if needed.
  4. Communications Scorecard – each month I send this communications scorecard to my superintendent and our board of trustees. This is a great way for me to analyze our content and locate trends, as well as illustrate our growth and top efforts.
  5. Stay Connected with our ISD – this is a great publication for parents and the community to see all of the many ways they can stay connected with your schools!

In addition to the documents above, I also want to offer two presentations that I shared at TSPRA last year that may also be of interest/help. One contains ways in which we have engaged various stakeholder groups and the other is a presentation I also use internally to start a dialogue about branding and public education.

C4 Yourself! Cultivate Community, Communication & Culture – bit.ly/bisdc4tspra
Are you BrandED? – bit.ly/tsprabranded

Productivity, Tools

WHY would I bother with fancy editing suites when this tool will do it in ONE CLICK?!

Recently my good friends from the Brenham ISD technology department blogged about this website called remove.bg.

Click here to see the full post – this is an AWESOME tech blog to follow!

I saw the post and browsed the content, but didn’t really need it at the time. And then last week – I needed it! I needed to remove the background from a picture and I needed to do it quickly. So I found the post and tried remove.bg and HOLY COW! It’s literally one click to get the job done!

Now, is it perfect? Nope. Is it super fast and great in a pinch? Yep! I would love to hear your favorite time saving tools, and don’t forget to follow my friends over at Brenham Tech Daily!

Google, Productivity, Tools

Getting started with Google Keep + a nifty Google Chrome trick for organization and productivity

Last week I shared how the use of Google Keep transformed how I organize and prioritize daily tasks for maximum productivity. Some of you had questions about what that looks like, so this week I want to share how easy it is to get started using Google Keep, plus a little Chrome trick that can help you pull it all together.

Go to keep.google.com.

Make sure you’re logged into your Google account. Below is what your screen will look like if you don’t have any notes yet.

Create your first list or note.

You have 3 choices: list, note with a drawing, or note with an uploaded image.
Tip: You can rearrange the list items or indent items by clicking and dragging.

It’s so much more than a list!

Google Keep is SO much more than just notes and lists. Check out the options by mousing over each little icon at the bottom of your list/note.

  • Remind me – get an email reminder with this information
  • Add a collaborator – helloooooo shared shopping lists 🙂
  • Change the color – my Fab Five list is red, so I can’t miss it
  • Add an image – great for screenshots to accompany the note
  • Archive – you can still recall archived notes/lists in left sidebar
  • Delete note – notes in your trash are permanently deleted after 7 days
  • Add label – great for organizing and searching
  • Add drawing – I gotta be honest … have never used this feature!
  • Make a copy – easily duplicate a note/list
  • Hide checkboxes – but WHHYYYY? Checking the box is all the fun!
  • Copy to Google Docs – cool feature, copies everything over to a Google Doc … this is helpful if your notes become too much for Google Keep and really need a Doc all their own.

Organize and prioritize notes and lists.

If you click the little push pin in the top right corner of your note/list, it will pin that note to the top of your collection. I use this trick + color coding to keep my lists organized and prioritized. You can click and drag your notes to put them in a specific order. My Fab Five list is always pinned to the far left corner since those tasks are my first priority.

Yes … my Fab Five list has grown to more like Terrific Ten … it’s all about flexibility, people!

Get the app for notes on the go!

Check out the Google Keep quick start overview from Google here and make sure you download the app on your phone so you can access your notes/lists from anywhere! Look for the little yellow sticky note / lightbulb icon in Google Play or the App Store.

Bonus trick: Set Google Keep as one of your startup pages in Google Chrome!

It’s easy to make lists and take notes, but you’re only as good as your follow through. I have found that setting startup pages in Google Chrome helps me start the day with everything I need for success.

To do this, go to your Chrome browser settings and scroll down until you see “On startup.” You can set your browser to open a specific set of pages every time you open your browser. I have mine set to open Gmail, Calendar, Drive and Keep. This simple trick removes one step for me when I begin my day and ensures that I attend to my Google Keep lists.

Tip: An easy way to do this is to open the pages you want to launch on startup and just click the option to “Use current pages.”
Productivity, Tools

How one simple suggestion + Google Keep completely changed my organization and productivity

I used to think I was a “do one thing at a time until it’s finished” kind of person, but since moving into a school PR role, I have discovered I am more of a “squirrel” type of worker. In school PR, we have to be able to switch gears quickly because we never know what’s going to come up. Many times I am in the middle of one project and another one gets thrown on the pile, or I am researching one topic when a new one comes up. This work environment can contribute to a lack in productivity and sometimes an increase in frustration.

Two years ago at our annual district leadership retreat, I shared this challenge with a colleague during one of our team building/reflection activities. I told him that despite my endless attempts at prioritizing and list making, I never felt like I accomplished what I needed to at the end of the day and that it was hard to really feel productive and strategic. He gave me such a simple suggestion that I had a real “DUH” moment.

Why don’t you make a list of your top 3-5 priorities for the day and tackle those tasks before you move on to anything else on your list?

THANK YOU, BMS Assistant Principal Larry Hughes!

Simple. Genius. Why didn’t I think of that?!

The very next day I set up my “Fab Five” list in Google Keep. I had been using Google Keep for years, but more for more for taking notes on the fly, not specifically for list making and task creation. It suddenly made so much sense to replace the notepad on my desk with a digital list that could be accessed from any device at any time and rearranged with a simple click and drag. (Is anyone else like me … if I have to reorder tasks on a paper list, I will just start over rather than scratch out!)

I “pin” the lists I use the most and make sure my Fab Five is the first one in the row.

I typically update my Fab Five list before I leave work in the afternoon so when I arrive the next morning, I know exactly where to start my day. I set Google Keep as one of my startup tabs in Google Chrome so it pops right up when I login each morning. I also created several secondary Google Keep lists to keep track of ideas, tools, articles, etc. that I come across.

Admittedly, this is not a perfect system and there are times when I have to deviate from my Fab Five, but this method really has changed my daily routine. It’s like having a daily dashboard that helps me stay organized and makes me feel more productive and strategic.

What methods do you use to stay organized? Do you have any tricks for productivity? Leave a comment below – I’d love to read your ideas!

Advertising, Marketing, Tools

30 second radio ads in 3 easy steps using 3 great tools

Part of my job is to script, record and schedule radio ads for our district. Last year was my first year to take on this role, as it was previously handled by a campus-based school PR liaison. Historically, the recording of our 30-second spots was outsourced to district or campus administrators; however, this year I took over in an attempt to create better quality, more strategic radio messages.

As a one-man PR office, I am always looking for quick, easy ways to produce quality content and with little (or NO!) financial investment. Now, if you are looking for sophisticated methods for producing fancy, professional quality radio ads, this post probably isn’t for you. But, if you fly solo (like me!) and need to get the job done well, for FREE, and in 5 minutes or less, read on, reader!

Step 1: Write script in Google Docs

Because we are a Google district (and I am a Google Girl), I do all of my scripts (and really everything else!) in Google Docs. I keep a Google Doc with air dates, topics, music used, and scripts for each radio spot. I love Google Docs because I can access it from anywhere, at any time and on any device. Whether I have an idea in my office, at a school function, or at a red light, I can get to my planning doc quickly and easily.

Step 2: Find ad music with FreeAdMusic

IMHO, radio ads with just voice and no music aren’t very pleasing to listen to, so I use FreeAdMusic which offers FREE, ready-to-use music for advertising. They have an awesome collections of clips that have met all of my ad music needs. Be sure to read their license terms before using (which pretty much say you can use it for works under 6 minutes for 1 year as long as it’s not to advertise or do something bad.)

Step 3: Record ad in Soundtrap

I had not used Soundtrap prior to this year, but I am SO GLAD I found it! It’s super easy to use (drag-and-drop) and FREE (for up to 5 projects at a time … I just delete and start over when I need more space). You can record voice & microphone, import audio files, and even make original music (although I do not use it for this purpose). With one click, you can download your final product as an .mp3. They also have an INCREDIBLE collection of tutorials to help you get started!

Do you have a favorite tip, tool or trick for recording radio ads? I’d love to hear it!

Tools

5 Chrome Extensions I use on a daily basis (and one to grow on!)

I love Google Chrome. It is absolutely my browser of choice. I also love Chrome extensions – little nuggets that let me customize my browser experience. These are my favorites and the ones that I pretty much use every day. The greatest thing about these extensions is that I don’t have to go anywhere or open any program or window to use them … they’re always right there in my browser ready to make my life easier!

  1. Awesome Screenshot – capture any part of your window and make annotations (love the blur tool for pictures of students or sensitive info!)
  2. ColorZilla – little eyedropper tool to grab the color from any place in your browser
  3. Page Ruler – quickly draw a ruler on any webpage to measure objects on the page
  4. Tab Scissors – split your browser window at the current tab
  5. Tab Glue – “glue” your split tabs back together

And my most favorite extension of all…

BITMOJI!

This Chrome extension absolutely, positively does not contribute in any way to my effectiveness or efficiency, BUT it brings me so much joy! I often aspire to communicate solely with Bitmojis.

In fact, my superintendent even uses Bitmoji! We’ve made some notecards for him to send to students with his avatar and they LOVE IT!

Ok – your turn! Leave me a comment with your favorite Chrome extensions. I am always looking for new ones to try out!

Tools

These 3 tools are better than a personal assistant! (Ok, not quite, but I can’t live without ’em!)

When you work in a small school district, you have to find creative ways to work smarter, not harder. There aren’t secretaries at every turn or levels of assistants for delegating tasks. We’re not “top heavy” and we all wear many hats to get the job done. (Fun fact: Even our superintendent shares his secretary!) The tools below are my staples for staying organized and completing tasks efficiently.

1. Google Calendar

Photo by Pixabay on Pexels.com

Warning: dramatic statement … I LIVE by Google Calendar. Like, really. There are times when I am walking in the hallway of a campus, hear the ding, and do an immediate about face to head in the opposite direction for a meeting that slipped my mind. Google Calendar is my TOP survival tool! Here are 3 of my favorite things about Google Calendar:

  1. It’s searchable. Can’t remember when you met with that guy last year? Do a search! I put TONS of details in my calendar events so I can search them easily later. This has saved me on several occasions!
  2. It’s a time management tool. I schedule EVERYTHING on my Google Calendar, including blocks of time to work uninterrupted on big projects. If it’s on my calendar, I know I will take the time to get the job done instead of putting it off, AND it keeps me from overbooking myself (usually!).
  3. It integrates with YouCanBook.Me. This is an AWESOME scheduling tool that I use regularly to allow teachers, principals and everyone in between book time on my Google Calendar. It’s user friendly, and the free version gives me everything I need.

2. Google Keep

Photo by Pixabay on Pexels.com

I am pretty much a “Google Girl.” I love all things Google – especially when the tools help me do my job better and keep my sanity (win-win!). Google Keep is such a powerful tool, but it’s not one of the main apps, so I think it’s underutilized. Google Keep allows you to create digital sticky notes and task lists. Here are 3 of my favorite things about Google Keep:

  1. It’s with me wherever I go. Because these digital sticky notes sync to my Google account, I can access them from anywhere and on any device. Long road trip and your mind is racing with ideas/tasks? Open up Google Keep and make a list. Check the tasks off when you get back to the office!
  2. Notes and lists are sharable. Need to brainstorm with a colleague or share tasks? No problem – just share the digital sticky note. (This works really well for tandem grocery shopping, too!)
  3. It’s a productivity tool. I use Google Keep stickies for daily priority lists and “top tasks.” I have a “Fab Five” sticky note that is pinned to the top of my Google Keep screen with the five things I must complete today. This little nugget keeps me on track (and can keep the stress at bay!).

Boomerang for Gmail

Photo by Karl Gerber on Pexels.com

If your inbox is a disaster or you are one of those “wake up at 2am and work” kind of people, you need Boomerang in your life. Boomerang does these things for you:

  1. Schedule emails to send later (like, NOT at 2am … don’t be that guy!).
  2. Temporarily archive emails and have them pop back up in your inbox at a certain time. (It’s like snooze for your email!)
  3. “Boomerang” an email back to your inbox to remind you to follow up if you haven’t gotten a response from the sender.

What tools keep you from pulling your hair out?!

Tools

The Journey Begins (Again!)

I started my first blog, EdTechChic, in 2011 as a way to connect and collaborate with other professionals, as well as share little tips and tricks I learned as an instructional technology specialist. I am a big believer in sharing content and ideas with others rather than hoarding all the good stuff for yourself. I remember seeing a post on Pinterest years ago that said something to the effect of, “Why won’t you share your idea? Are you afraid it’s the last one you’ll have?” I always told people to use anything I created and shared. I already had the glory. Pass it along. Together we’re better.

“Alone we can do so little; together we can do so much.” – Helen Keller

Although I truly loved blogging, when I accepted a new role as communications director in my district in 2016, I found that I had very little to contribute. I’d been “EdTechChic” for years, but this new role was taking me in a very different direction – uncharted territory. It has taken me nearly 3 years to find my footing as a school communications practitioner and feel as though I have anything valuable to offer my professional network again. I have learned a lot along this journey, and I am excited to move from consumer to producer once again.

Every day I learn something new about public relations and communications, especially as it relates to the education industry. I look forward to sharing ideas, tips, and tricks, as well as learning and collaborating with you.

Check out the toolbox page before you leave! I will be elaborating on and adding new tools as the blog develops, so check back often. What are your favorite “work smarter, not harder” PR tools?

click here for my favorite tools